Panther
This page gives information about usage of the Husarion Panther.
Physical robot
Quick start
The physical robot can be started with the following steps:
Enable the battery (switch at the front of the robot).
Start the robot (press red power button).
Wait until the E_STOP animation is played
Release hardware stop (rotate red emergency button if it was pressed).
Start the Logitech gamepad:
press Logitech button.
press mode button if mode light is on (should be off).
put the switch at the back on D.
Remove the E_STOP by Left Trigger + A on the gamepad.
You can drive by pressing Left Button and use the two joysticks.
You can enable the E_STOP by pressing B.
See this for more information about gamepad control.
The robot can be shut down as follows:
Shut down the robot (hold red button next to battery switch till it starts blinking).
Wait until all lights are off.
Disable the battery (switch at the front of the robot)
Configuration
When the Panther is started, two WiFi networks (Panther_<serial_number> and Panther_5G_<serial_number>) should be available. One can connect with one of the WiFi networks or connect using a ethernet cable directly to the Teltonika (this may require to remove one of the other ethernet cables, like the one of the lidar). After connecting, it should be possible to ssh into all three computers.
Teltonika RUTX11:
This is an industrial router. The Raspberry Pi 4 and Lenovo ThinkStation P360 are connected to the Teltonika by Ethernet. Also the Velodyne Lidar and is connected to the Teltonika by Ethernet. A combo antenna (the black dome) is also connected, which enables the Teltonika to obtain a GPS location.
Raspberry Pi 4 :
The Raspberry Pi 4 is built in the front of the Panther and not directly accessible. Two Docker images are pre-installed: a docker image of the panther_ros repository and a docker image of the joy_to_twist repository. Both images are started automatically when the robot starts, as do all docker images installed on the Pi. The first image runs all the required software to use the robot, like motor control and led control. The second image enables gamepad control with the Logitech gamepad shipped with the robot, when the USB receiver is connected to the USB port at the front of the robot.
We have also cloned the nmea-gps-docker repository with a docker that enables use of GPS in ROS. This docker images gets started automatically as well when the the Panther starts. For more information about the use of this docker, see the Sensors section.
Lenovo ThinkStation P360
The Lenovo ThinkStation P360 is a powerful computer, used to handle the camera stream. The robot is shipped with a ZED 2i depth camera, which can be connected to the ThinkStation by USB-C. We have installed the required Nvidia software, based on our own Docker installation to run dockers with use of the Nvidia CPU. Next, we cloned Husarion’s zed-docker, realsense-docker and velodyne-docker to the ThinkStation. These docker images enable easy use of the ZED and Realsense camera’s or Velodyne LiDAR. For more information about the use of these dockers, see the Sensors section.
Sensors
The Husarion Panther is shipped with different sensors:
ZED 2i depth camera
Velodyne VLP 16 LiDAR
GPS (using Teltonika RUTX 11)
For all sensors, Husarion provides docker images to easily start them connected with ROS.
ZED 2i:
To use the ZED 2i camera, ssh into the ThinkStation. Here you can find the cloned zed-docker repository folder. The docker can be started with these commands:
cd ~/zed-docker/demo;
xhost local:root;
export ZED_IMAGE=husarion/zed-desktop:humble;
export CAMERA_MODEL=zed2;
docker compose up zed;
We also created the script ~/zed which executes these commands. Running the docker with the camera connected should start the ROS nodes that publish the camera stream on ROS topics.
Realsense:
Use of a Realsense is similar to the use of ZED camera. You can find the realsense-docker repository folder on the ThinkStation and start the docker:
cd ~/realsense-docker/demo;
xhost local:root;
docker compose up realsense;
We also created the script ~/realsense which executes these commands. Running the docker with the camera connected should start the ROS nodes that publish the camera stream on ROS topics.
Velodyne:
To use the Velodyne LiDAR, we have to make sure that the Velodyne uses the ThinkStation as host. The settings of the Velodyne can be reached by it’s ip-address, which can be found by a network scan:
nmap -sn 10.15.20.0/24
One of the devices in the network should be che.lan (which is the Velodyne). Now we can open the settings by going to this ip-address in a browser:
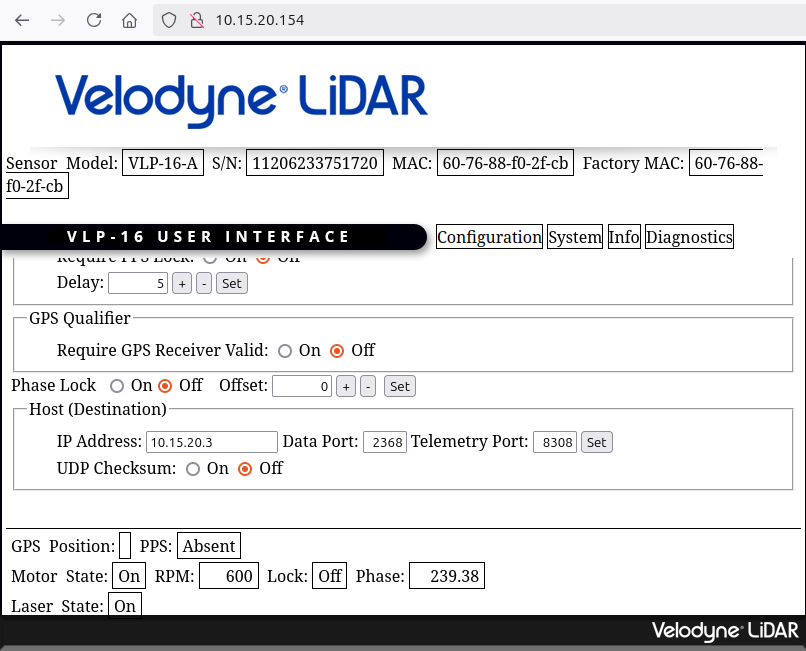
Here, we can set the host ip-address the ip-address of the ThinkStation. Next, you can find the velodyne-docker repository folder on the ThinkStation and start the docker:
cd ~/velodyne-docker/demo;
docker compose up;
We also created the script ~/velodyne which executes these commands. Note that the settings of this docker can be changed in the two files in the ~velodyne-docker/demo/config/ folder. Especially the device_ip parameter in the panther_velodyne_driver.yaml is important and needs to be the ip-adress of the Velodyne.
The topic /panther/velodyne/velodyne_points can be used to visualize the LiDAR data.
GPS:
To use the GPS in ROS, the nmea-gps-docker image is started automatically on the Raspberry Pi. This docker only works if the Teltonika forwards the GPS data to the Raspberry Pi. The corresponding settings can be adapted by accessing the ip-address of the Teltonika. Default username is admin and default password is Husarion1 and logging in should give you the settings:
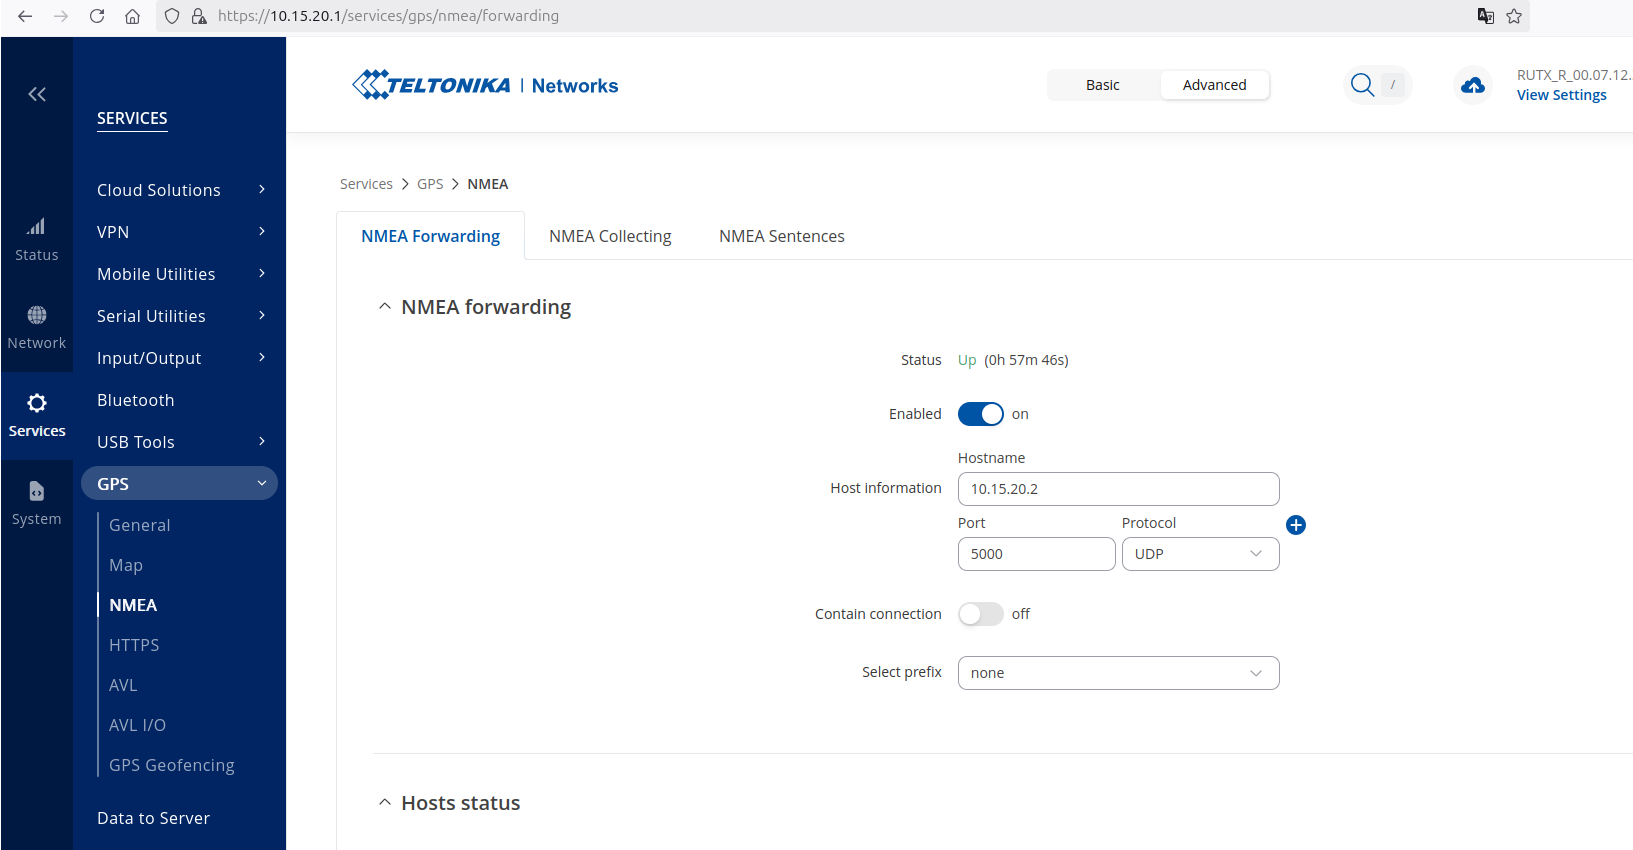
Make sure that Hostname is set to the ip-address of the Raspberry Pi. The docker image should now publish the GPS location on the ROS topic panther/gps/fix, if the location is available. Note that GPS might not work indoor. The GPS can also be tested in the Teltonika map page.
Simulation
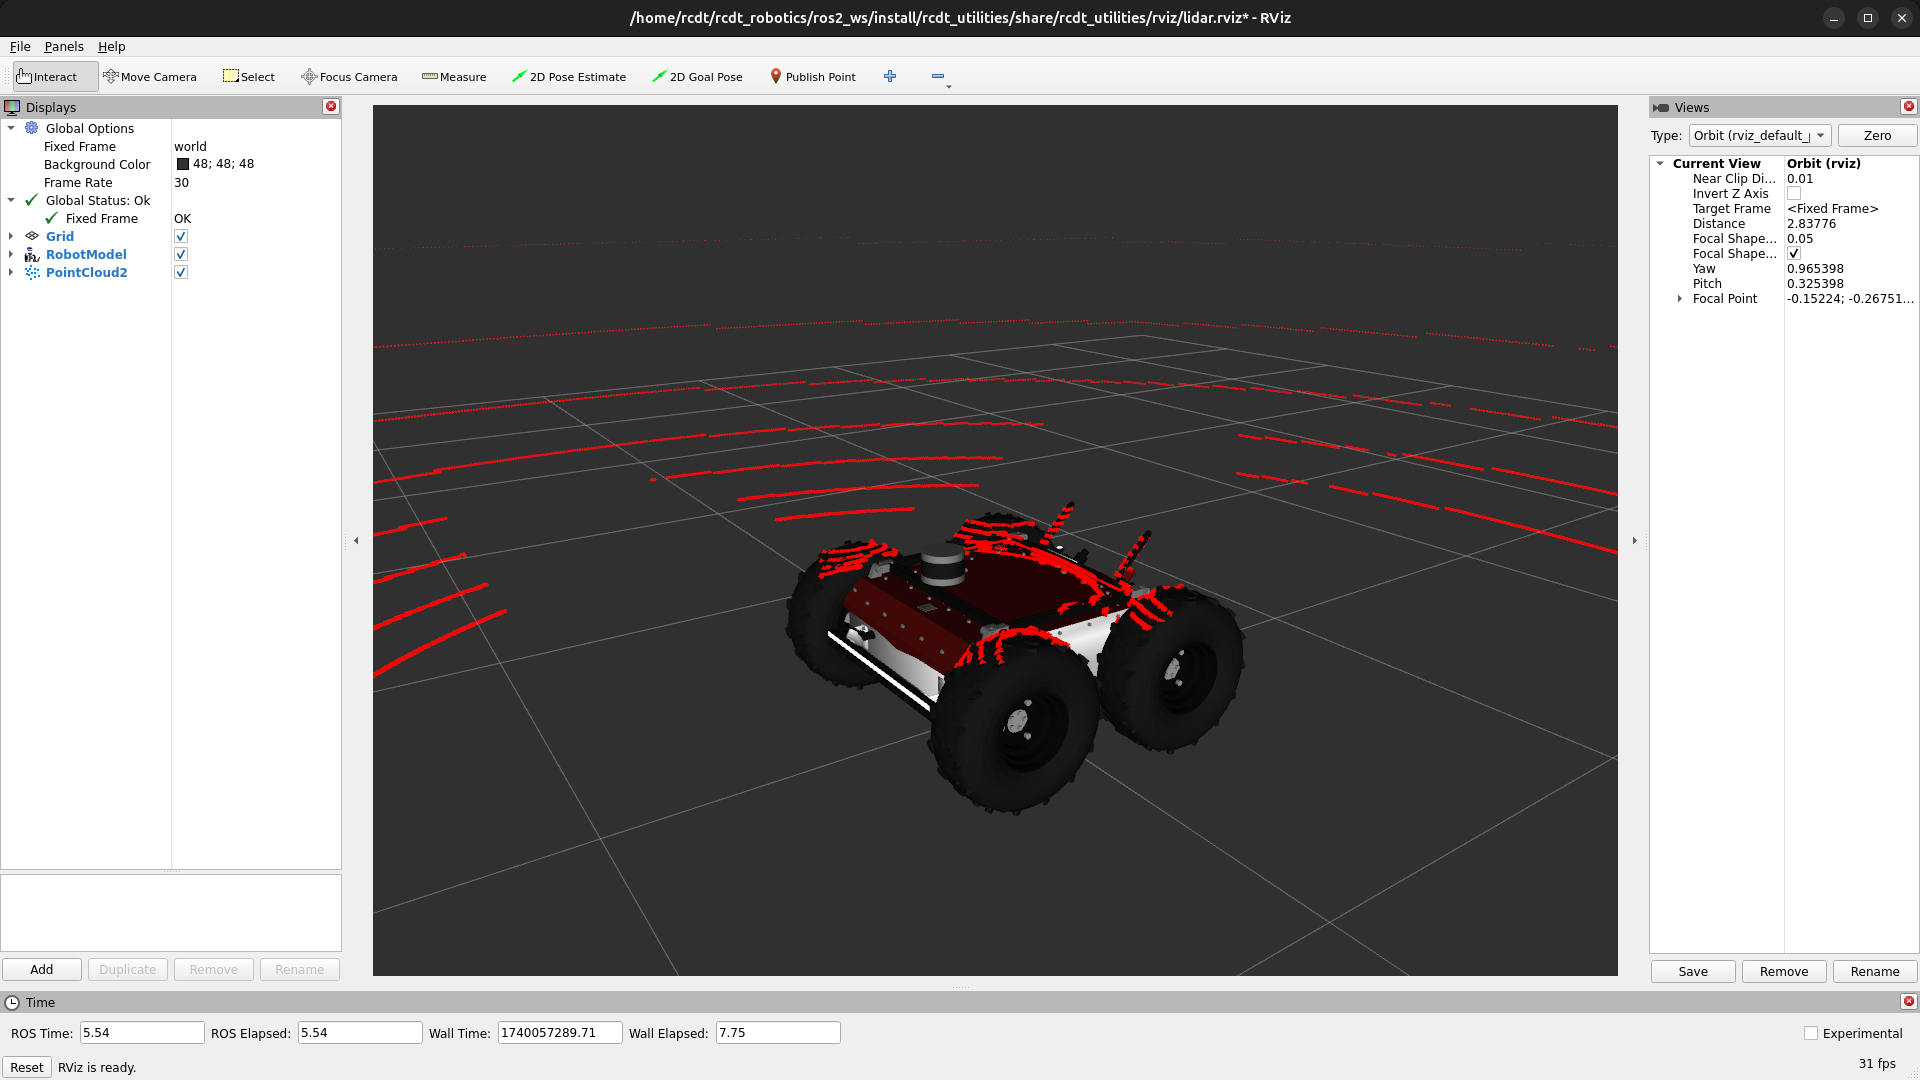
You can start a simulation of the Panther using the rcdt_panther/rcdt_panther.launch.py file. It can be started including a simulated Velodyne lidar by passing the velodyne:=True flag:
ros2 launch rcdt_panther panther.launch.py velodyne:=True
This should start the simulation with the following Rviz visualization:
You can control the simulated Panther if a gamepad is connected. By default, the E-STOP is triggered and you need to reset this before you can control the Panther:
ros2 service call /panther/hardware/e_stop_reset std_srvs/srv/Trigger {}
Using an User Interfaces
Default Panther UI
To use the user interface created by Panther:
Start the Panther.
Connect to the Panther network.
Open a browser and go to: http://10.15.20.2:8080/ui
You can also control the Panther with your mobile phone, tablet or any other device in the same way.
Our Custom UI
To use the custom-built user interface:
Start the launch file with the UI flag enabled:
ros2 launch rcdt_panther rcdt_panther.launch.py ui:=True
Access the interface:
In simulation:
http://localhost:5000
On the real robot: after connecting to the Panther network, open
http://10.15.20.3:5000
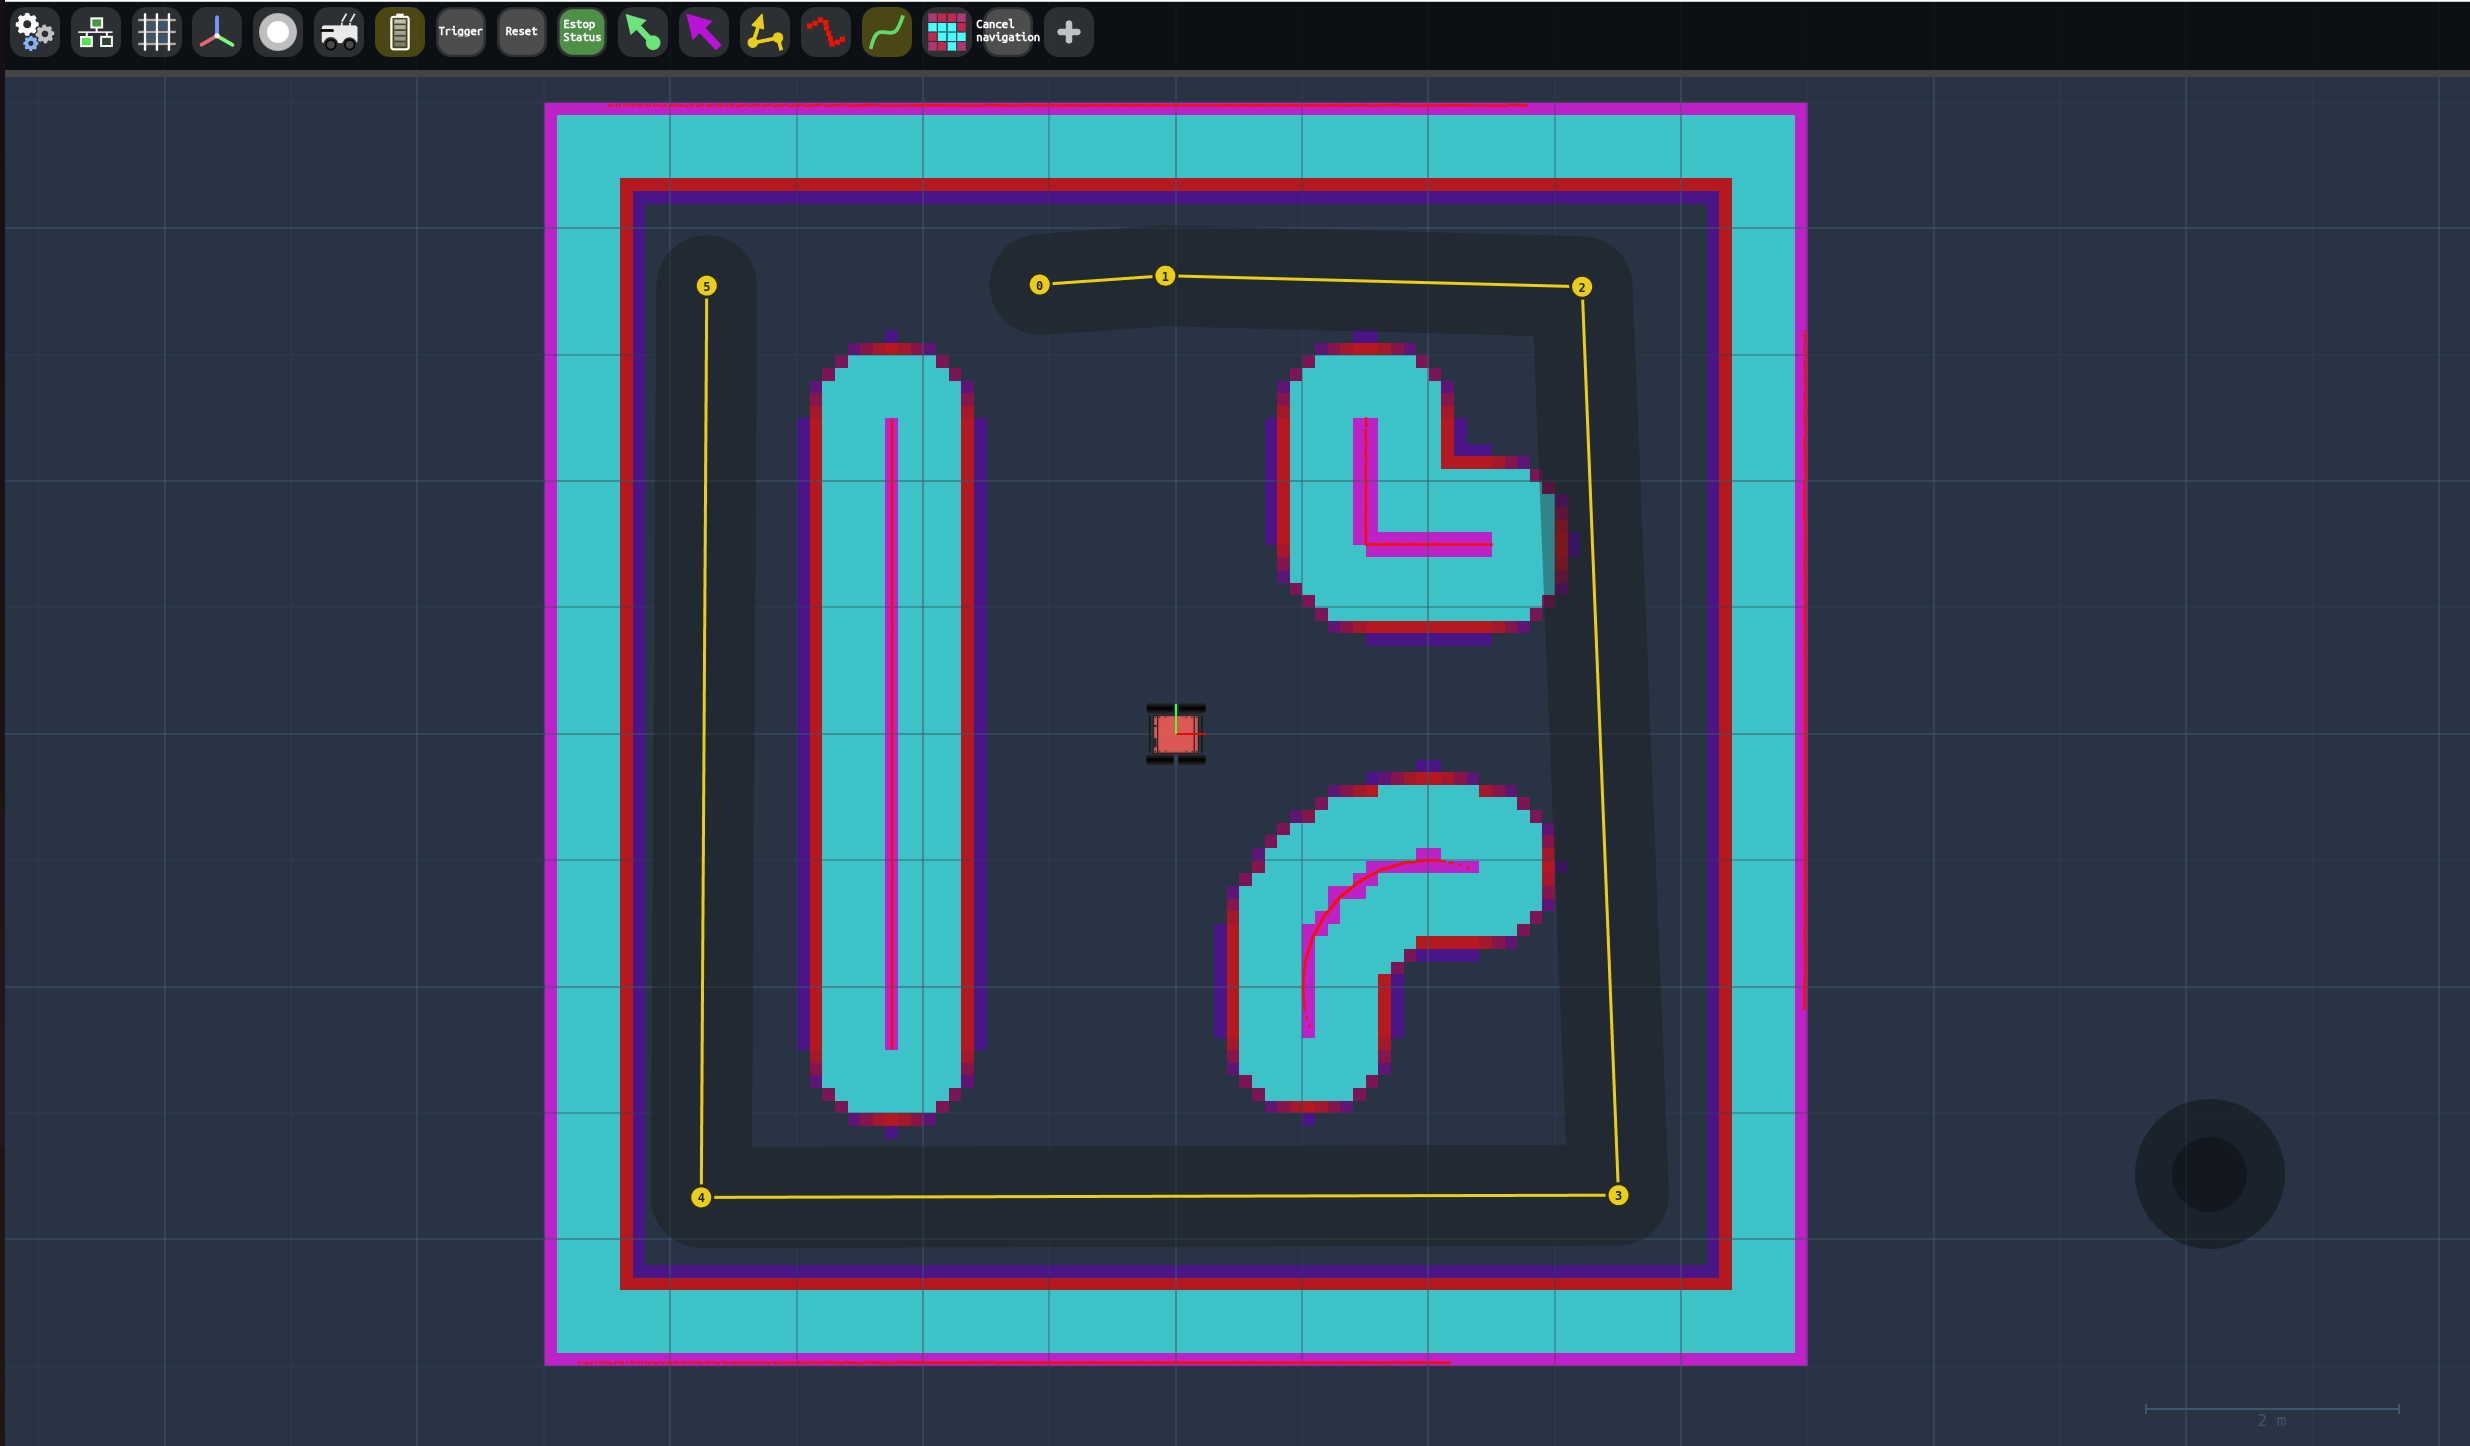
Example
The interface should look something like this:
Proposed changes to reduce network traffic
During experimentation it became clear that at least ethernet-speed connections are required in order to deal with pointcloud data without dropping messages. The current high-level architecture when using a LiDAR is as follows:
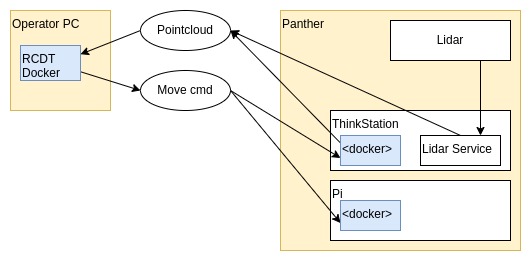
A major advantage to this architecture is that it allows for fast and easy development, and straightforward inspection of any ROS topics using Rviz and/or ROSBoard. However, this makes it impossible to use wifi to operate the robot, making a cable mandatory. This provides obvious limitations for use-cases where further autonomy is required.
One proposed alternate setup wold be to move the RCDT docker container to the onboard ThinkStation. This would eliminate the need to broadcast pointcloud data over the network, instead keeping it all within the robot itself.
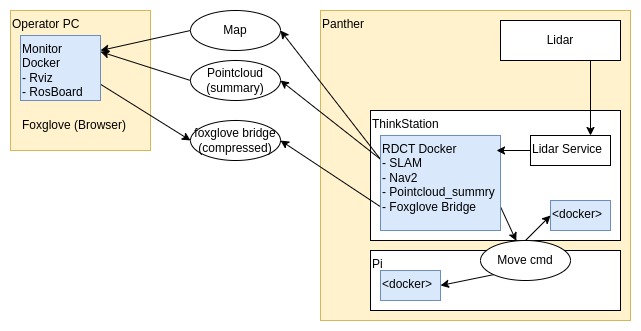
A downside to this approach, however, would be that live inspection of data generated by the robot becomes more complex. Lower-bandwith data such as a generated map or camera data would be no problem to consume using a simpler “monitor” docker container that only needs to run Rviz and/or ROSBoard.
Additionally, the RCDT docker could be extended to run foxglove. One of the promising features of foxglove is that it supports 3D data visualizations in-browser, and supports compression of topics. It appears this compression would be lossless, but this has not been explored in detail, yet. A simple intro to foxglove with some basic examples is provided in this blogpost. It is also worth noting that foxglove requires certain ports to be exposed in the docker container, similar to how is dicussed here. Finally, foxglove also provides a level of integration with ROSBoard allowing for some reuse of the ROSBoard features we have already set up.
Another approach could be to create a (lossy) compressed topic for pointcloud data that would only serve inspection purposes; not SLAM/nav2 purposes. This would require further investigation into the current state of availability of these kinds of topics, though, since the thread linked here is a few years old.
It also bears mentioning that Husarion provides a web UI, but this appears to be poorly-maintained. Additionally, it requires snap packages, which are tricky to install in a dockerized environment.